A Welcoming Sign
The Welcome Sign transformation
BLOG
Medium
Low
4-6 Materials
1 Hour


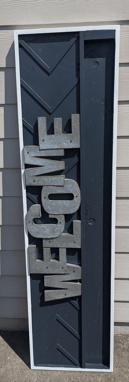
What started as a simple batch of metal welcome letters on a plain pine board had to have an upgrade after the porch refresh. To make the transformation it meant some local home improvement store trim, DIY wood working, paint, and ingenuity.
For this one I didn't really start with a plan other than liking the look of chevron pattern, so I decided to try my hand at using the same PVC trim boards that I used on the ceiling during the porch refresh. For this one I needed about $50 in supplies between the outer trim pieces, the PVC trim boards and the almost black paint that I purchased at the home improvement store. The remainder of the pieces I already had.
I started by removing all the welcome letters from the original board and getting started with cutting the piece to make it the height that I was looking for. I knew from before that I didn't want it to be ceiling to floor because the bottom of the board would get wet and stained as it had done in the past, and I honestly didn't want the sign to be that tall again. After the board was cut to the height that I wanted I started adding the chevron pattern. This could have easily been done using a hand miter box kit, but I chose to pull out the electric combo miter box saw to make these cuts and also to use for the 45° cuts that I would need to frame it all out.
The chevron design was not cut at a 45° angle but instead straight cuts put together. Starting at the center (both width and height) I used a cordless brad nailer to affix the trim boards for the first chevron. After that it was a matter of evenly spacing them along the remainder of the board. Each chevron at this point in the process hung over the edge of the board since trimming this was easily done once they were all affixed.
To make space for the seasonal "slip-in" message that is contained inside I simply used a cedar fence picket and cut it to length. To be completely transparent here, this is one area that I should have tried a couple of different pickets in to verify the width of the pickets before completing the width. I used one picket that I purchased as a template and then went back later and bought more only to find out that the newest pickets had to be cut down in width. After all the trim boards were in place I used a 1/4 inch piece of plywood that I had left over from another project to fill the back on the piece.
The Build
With everything built, I gave the piece a light sanding, and it was time for paint. I went with an almost black paint for the base because I didn't want the chevron pieces to stand out, but more to blend in with the piece. I also plan to use this color as the trim boards for the house number redress project that I have yet to complete. After two coats of almost black paint over the entire piece, and plenty of drying time between and after the final coat, it was time to paint the exterior trim boards in white.
Paint
Now here is where I went off the rails a little and tried a couple of different styles with the welcome letters. I first put them back on the piece just like they were originally on the first rendition. That was just okay to me but not really quite what I was looking for in the piece, so I got creative. I tried a couple of different layouts before I landed on the one that you see in the picture with the letters just slightly overlapping each other. To create this look I had to get crafty with tin snips, gloves (safety first) and some pliers to pull out and press down sharp edges of the metal letters.
Use Caution if you decide to go this route. Metal is sharp, and you need eye and hand protection while you do this. Remember - safety first - always.
To determine how I wanted this to look I had to try a couple of different layouts before I marked and cut out the metal pieces from the letters so that they would overlap each other and get the look I was after.
Letters
Materials
Supplies here
Tools

Tools here
Project Wins

Project Wins listed here
Project Fails

Project Fails listed here
Shop the Post

See an item you have to have? Shop for the items listed below.
This page contains affiliate links
Kevin Gallaher is the owner of this blog, papapinterest.com. I have applied a skill level based on my own experience and provided minimal instructions on how to achieve a similar outcome. Please remember that this blog is for entertainment purposes only. With all the posts on papapinterest.com, be certain to read and understand the project before starting. Build at your own risk and be safe. We will not be responsible for any injury or damage incurred while following any post from our site. None of our posts should be considered expert advice, so please consult a professional when necessary. Be sure to read and understand all safety and instruction manuals, and take safety precautions seriously. All projects performed from posts found on our site are done at your own risk.
DIY Disclaimer


