Braided Bread Tradition
The story of the braided bread holiday tradition that almost wasn't.
RECIPES
Low
Low
8 Materials
1.25 Hours
In the era of kiddie school days, we'd eagerly scoop up those twisty breads every year for the youngsters' fundraiser - a tasty tradition that sneaked its way into Christmas and Thanksgiving mornings.
Zoom to the middle school era, where these golden pastries were like rare treasures, but fear not, a sly swap with coworker parents would land me a couple of these delights.
But as time ticked on, the hunt for our beloved breakfast treat turned into a wild goose chase, leading us to tap into school networks for leads on where to find it.
Then disaster struck - our supply chain dried up, pushing me to embark on a quest. Little did I know, a simple recipe awaited me, letting me customize flavors to my heart's content. Even a baking novice like me managed to whip up the magic!
Preheat the oven to 375 degrees Fahrenheit.
The recipe is simple and calls for the following ingredients:
2 cans of Crescent Rolls
1 package of Cream Cheese
1/3 to 1/2 cup of Powdered Sugar
1 Can Pie Filling or 1 bag of premade pastry filling (found at the US Chef's Store or your local grocer may carry them)
Parchment paper
1 egg
Begin by mixing a cube of softened cream cheese with 1/3 to 1/2 cup of powdered sugar in a small bowl. Set this mixture aside. Place parchment paper on a small cookie sheet. Unroll one can of crescent rolls and separate them, overlapping them on the sheet to create a wide triangle shape.
Example →
Spread the cream cheese and powdered sugar mixture generously along the center of the crescent rolls. Add the pie or pastry filling on top of this mixture.
Fold the top middle of the rolls slightly over itself to prevent filling leakage. Then, fold the long end of each crescent roll over to the top of the roll on the other side, tucking it underneath to secure it.
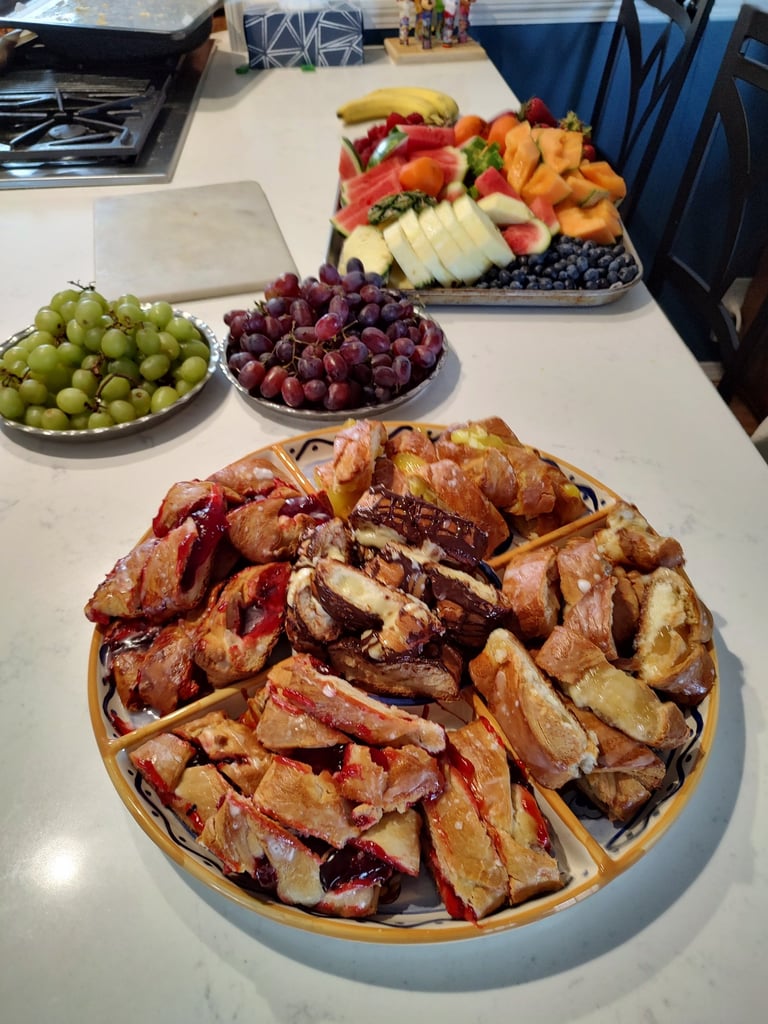
Repeat this process for all the crescent rolls. Bake for about 15 minutes at 375 degrees, then brush with an egg wash and bake for an additional 8-10 minutes. Once cooled, drizzle with a diluted powdered sugar glaze or chocolate syrup. Slice and enjoy the finished pastry.
Yield - 2 twisted pastry rolls


Materials
2 cans of Crescent Rolls
1 package of Cream Cheese
1/3 to 1/2 cup of Powdered Sugar
1 Can Pie Filling or 1 bag of premade pastry filling (found at the US Chef's Store or your local grocer may carry them)
Parchment paper
1 egg
Tools
Parchment Paper
Cookie Sheet(s) - we use small ones
Pastry brush (for egg wash)
Of course an oven :)
Project Wins
I'm not the cook or baker in the household and I make these every year. If I can do these, you can do these.
Everyone loves these
You control the flavor combinations - Our new favorite is custard and chocolate drizzle.
Project Fails
Know your oven! I have found that I need to cook these longer than what is included in the instructions on the roll package. If you don't the center may not be cooked through.
Cook them first, then egg wash after they have been in for the first cook cycle. Finish them for the remaining time so that they brown well on top.
Kevin Gallaher is the owner of this blog, papapinterest.com. I have applied a skill level based on my own experience and provided minimal instructions on how to achieve a similar outcome. Please remember that this blog is for entertainment purposes only. With all the posts on papapinterest.com, be certain to read and understand the project before starting. Build at your own risk and be safe. We will not be responsible for any injury or damage incurred while following any post from our site. None of our posts should be considered expert advice, so please consult a professional when necessary. Be sure to read and understand all safety and instruction manuals, and take safety precautions seriously. All projects performed from posts found on our site are done at your own risk.
DIY Disclaimer