Shadow of the Night
A shadowy figure in the night
FEATUREDSEASONAL
Medium
Low
10 Materials
2 Days
As the Halloween season nears its of course time to get the decorations started around the house. Each year we start with fall decorations outside which lead into Halloween which lead into barely enough time for Thanksgiving. This year may be a complete whirlwind when Christmas rolls around since the Thanksgiving holiday is so late in the year.
Anyway, I digress a bit. Each year we take over one of the 2 single car garage doors with lumber and materials to make a fake wall with a window in it so we can play Halloween movies for the stream of trick or treaters that hit our neighborhood each year. With about 100 kiddos at the door each year the movie is always a hit!
Up until this year we had the "Happy Halloween" magnetic letters and figures that would attach to the blank garage door that helped it fill in some, but those had to go away last year as the sun had finally done its toll on them and the fading was way too much. So, this year the garage door was going to be very blank.
About a year earlier I had found the little witch cutouts at the Dollar Tree and thought how cute she would look on the mantel as a Halloween decoration. Time took over a bit and I hadn't gotten around to using her and ran across her in my craft supplies and thought, I really need to make the mantel decoration this year.
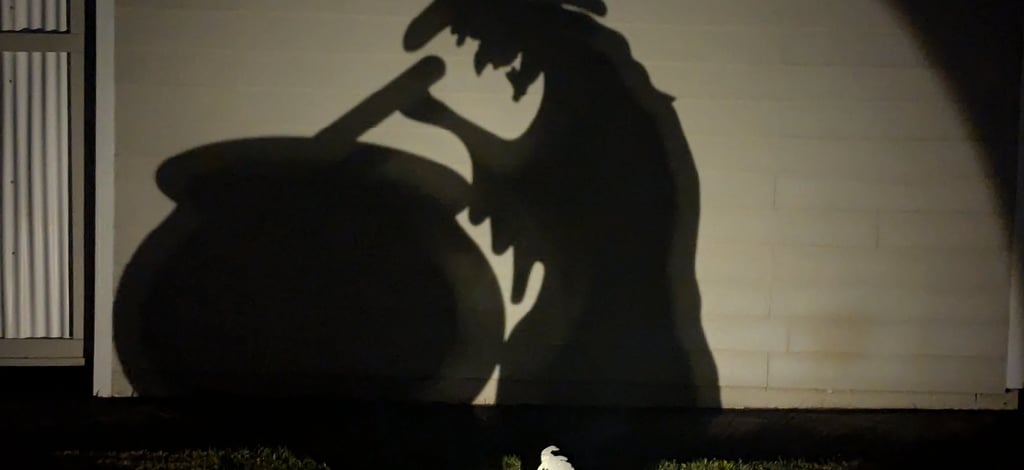
Then one day at my local discount membership store I ran across a solar floodlight that had been marked down to just $7 for end of the season clearance. To be honest here I purchased the floodlight thinking that I would use it as part of the Christmas decor that our neighborhood goes wild for every year, but then I ran across a post where someone had placed a floodlight in front of the Sanderson sisters from the Hocus Pocus movie and suddenly the idea came to "light" for me.
Now right off, I didn't really think about shining the shadow on the front of the garage door, but just was interested in trying it see if I could even get it to work at all, so I tried it on the exterior of the shop wall first. I was so impressed that the wheels started turning about where I could put it. I first thought about the wall on the front of the house between the two-bedroom windows, but after I tried it there, while it worked, that's also where the planters are and they seemed to block part of the shadow from accurately showing up. Then I suddenly remembered that big blank garage door.
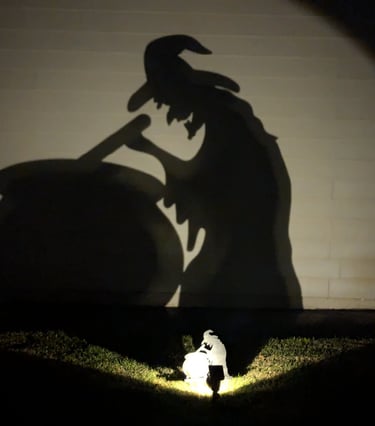
After a test run to see if the concept would work, I got to building. After all there was no placing a floodlight stake in the cement driveway. Now to clear up any questions on parking - No we don't park in our garage, especially when there has to be a movie projecting against the backdrop over the window from inside the garage, but we do have a cement driveway strip that goes the entire length of the house and continues into the back yard and meets up with our shop. This gives us enough room to park both cars alongside the house for holidays, family gatherings, etc... This way the movie is not blocked and neither will be the shadow of the witch on the garage.
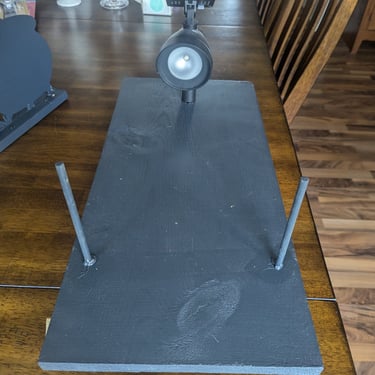
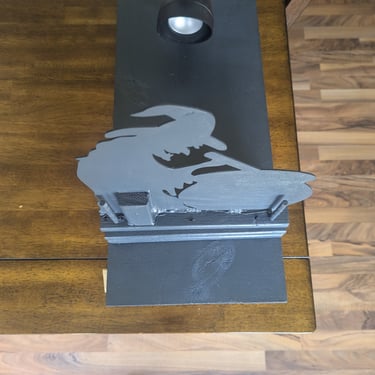
To accommodate the setup of the witch and floodlight I had to build a "unit" if you will to hold everything. I accomplished this with some pine lumber, furring strips, dowels, glue and paint.
I'd like to be able to reuse this and since this will sit in the driveway in October with the rain likely returning, I painted this using exterior house paint, 2 coats to seal up any exposed wood.

Preparation
After gathering the materials needed to construct this "unit" or holder, I prepped the following:
Cut the base (1x12) to 24".
Cut 1x2's to the width of the base, (about 11.25"). Note, I am cutting four 1x2's here due to the slant of my driveway and how the shadow needed to appear. I have one 1x2 attached to the bottom of the base to create a slant. Test your shadow against your driveway to determine how many you will actually need, then increase or decrease accordingly.
Cut a single 1x2 to 4".
Cut the dowels to the height needed keeping in mind that they should not extend above the witch when assembled.
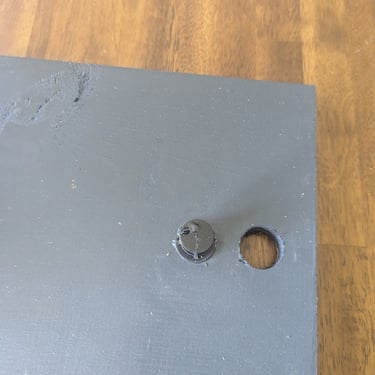
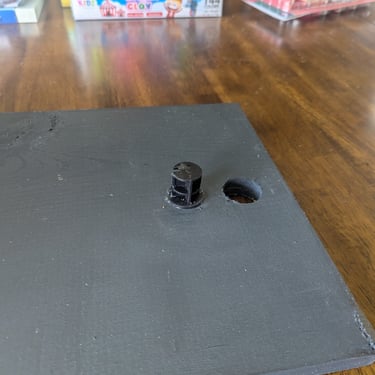
Cut the spotlight stake off just below where the base of spotlight sits.
Drill a hole in the base for the spotlight base to be attached into. To be honest here the pictures will show two holes in the wood (the second hole is optional) and truth be told it was my first attempt at drilling the hole for the spotlight base, which ended up being too big. The bonus to it for me is that I'll have a way to store it hanging up.
Assembly
The Witch:
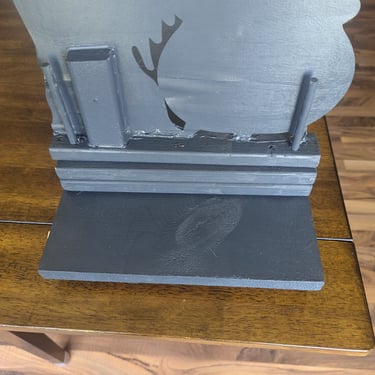
Determine where on one (1) of the 1x2's cut to 11.25", you will mount the witch. She is mounted using hot glue at first to hold her in place followed by Gorilla Glue to make sure she stays in place.
Attach the 4-inch 1x2 to the base 1x2 that is now glued to the witch, turned to be mounted up and down against the back of the witch (see pictures). Attach using hot glue and gorilla glue, followed by brad nails 1.25" up through the bottom of the base and into the turned 4-inch 1x2. Finish by attaching the witch with a small wood screw to the 4-inch 1x2 from the front of the witch.
The Base:
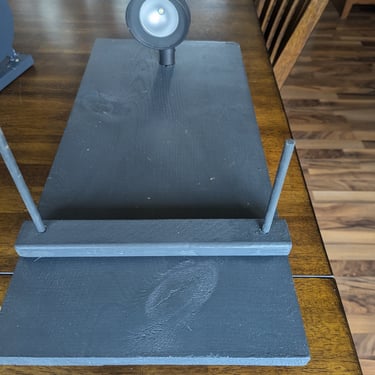
Line up your 1x2's cut to 11.25" stacked one on top of each other along with the witch on the top of all of them and determine where you will drill your holes for your dowels to fit through. Go from the witch down through the 1x2's and into the base. I went through the base on one side but not on the other, but recommend not going all the way through if you can. Either way it will still work, it was just a little tougher to get the glue to not seep out on the side that was drilled all the way through.
Glue your doweling in place using some hot glue to hold them in place at first followed by a generous amount of Gorilla Glue. Let dry, I recommend overnight.
Glue into the base your cutoff spotlight base holder using both hot glue and Gorilla Glue. Let dry, I recommend overnight.
Attach one of the 11.25" wide 1x2s to the bottom of the base. This will allow for a slant on the entire base to give you runoff of rainwater.
Next, we are at the point of being ready to paint everything. I used an exterior house paint (satin, in the color of Chimney Smoke, 2 coats)
All put together:
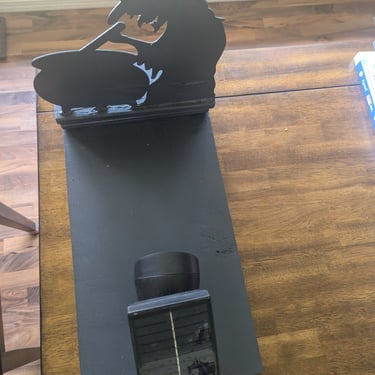
Install the spotlight on the base.
Slide the number of 11.25" wide 1x2's onto the dowels that you will need to get your shadow where you want it to appear on your wall or garage door.
Slide the witch on the top and you're ready for placement on the driveway.
Note: As I mentioned earlier in this post. We have ample parking to accommodate both cars on the side of the house which opens our driveway up. To be sure that no parking can occur in the driveway we use orange traffic cones (available at the local home improvement store or on Amazon) to block off the driveway during this time which also protects the "unit" from being damaged.
Enjoy your new Halloween decoration!
Materials
(1) 1x12 - 24 inches in length
(1) 1x2 up to 44 inches in length
(1) dowel up to 18 inches in length
Gorilla or any outdoor glue
Hot glue
Exterior Paint
Dollar Store Witch cutout
Solar -or- electric spotlight
Brad or Finish Nails
Wood screws
Tools

Circular or Hand saw
Impact driver or drill
Paint brush
Sander or sandpaper
Project Wins

What a great way to fill in an otherwise empty garage door
This was relatively inexpensive and accomplished mostly with scrap wood I already had around the house
Project Fails


Be certain that you are using outdoor paint or sealant for this project. I originally painted the witch with craft paint to give it a test run first. She split a little in spots and this was even before any real moisture was around. Just morning dew, so I had to repaint her.
Shop the Post


Kevin Gallaher is the owner of this blog, papapinterest.com. I have applied a skill level based on my own experience and provided minimal instructions on how to achieve a similar outcome. Please remember that this blog is for entertainment purposes only. With all the posts on papapinterest.com, be certain to read and understand the project before starting. Build at your own risk and be safe. We will not be responsible for any injury or damage incurred while following any post from our site. None of our posts should be considered expert advice, so please consult a professional when necessary. Be sure to read and understand all safety and instruction manuals, and take safety precautions seriously. All projects performed from posts found on our site are done at your own risk.
DIY Disclaimer